Designing
a Supercharger System - Page 2
by: nitrofumesrule
 Next
I addressed the coolant and EGR passages. These were easy. I had
a ¾" aluminum barb fitting welded over the coolant passage.
The EGR passage I just had welded over. I cut out some braces for
the plenum to runners and had them welded on. Fuel was after that.
I ordered a custom fuel rail from Momar Injection. I drew out what
I needed with the proper spacing, faxed it to him, and he cut and
drilled the injector openings. Which brings me to a side note. I
talked with him about what options I had as to where the return
line could be. I didn't have room on the one end to do a return
there so I asked if it was possible to do it in the middle of the
rail. He suggested a returnless fuel rail. I asked if there would
be a fuel starvation issue with the last injectors. He said not
unless I was flowing enough fuel for, say, 800 H/P. Enough said.
So he made the rail for me and I bought an Aeromotive FPR from him,
along with the proper O-ring fittings for the rail and FPR. I cut
out some mounting tabs for the rail and manifold. These were welded
on. I then rounded up some injectors. I was thinking 24's wouldn't
be large enough and 35's were too big so I wanted 30's. This was
another feat. It took about a month to search up 4 low impedance
30# Bosch type injectors. They are out of an 82-83 Murker XR4Ti.
A guy had some brand new that a friend of his tried out because
he thought his were bad. His loss my gain, $125. That's cheap, dealer
cost on these injectors were $280. Well once all of that was assembled
and on the manifold I could see how much the alternator had to be
moved. I made a spacer to move the upper mount back ¾".
I also had to remove one of the plastic covers on the alt. All in
all not a bad deal there. Next
I addressed the coolant and EGR passages. These were easy. I had
a ¾" aluminum barb fitting welded over the coolant passage.
The EGR passage I just had welded over. I cut out some braces for
the plenum to runners and had them welded on. Fuel was after that.
I ordered a custom fuel rail from Momar Injection. I drew out what
I needed with the proper spacing, faxed it to him, and he cut and
drilled the injector openings. Which brings me to a side note. I
talked with him about what options I had as to where the return
line could be. I didn't have room on the one end to do a return
there so I asked if it was possible to do it in the middle of the
rail. He suggested a returnless fuel rail. I asked if there would
be a fuel starvation issue with the last injectors. He said not
unless I was flowing enough fuel for, say, 800 H/P. Enough said.
So he made the rail for me and I bought an Aeromotive FPR from him,
along with the proper O-ring fittings for the rail and FPR. I cut
out some mounting tabs for the rail and manifold. These were welded
on. I then rounded up some injectors. I was thinking 24's wouldn't
be large enough and 35's were too big so I wanted 30's. This was
another feat. It took about a month to search up 4 low impedance
30# Bosch type injectors. They are out of an 82-83 Murker XR4Ti.
A guy had some brand new that a friend of his tried out because
he thought his were bad. His loss my gain, $125. That's cheap, dealer
cost on these injectors were $280. Well once all of that was assembled
and on the manifold I could see how much the alternator had to be
moved. I made a spacer to move the upper mount back ¾".
I also had to remove one of the plastic covers on the alt. All in
all not a bad deal there.
 Now
for some bracketry. I had to make two supports to hold the manifold
on the engine and another piece for the front to mount the manifold,
the snout of the blower, and have an idler pulley to wrap the belt
around the S/C pulley. The two lower manifold braces were made from
¼"x 1" steel. These mount to the manifold and to
the engine block where the factory locations are. The front bracket
was cut from ¼" steel. It mounts to where the P/S was
mounted. I had my machinist turn a spindle for the idler pulley,
which is a Saturn OEM part. It's the pulley off the tensioner. After
this piece was made I powdercoated all the bracketry and alt. spacer
black. Now
for some bracketry. I had to make two supports to hold the manifold
on the engine and another piece for the front to mount the manifold,
the snout of the blower, and have an idler pulley to wrap the belt
around the S/C pulley. The two lower manifold braces were made from
¼"x 1" steel. These mount to the manifold and to
the engine block where the factory locations are. The front bracket
was cut from ¼" steel. It mounts to where the P/S was
mounted. I had my machinist turn a spindle for the idler pulley,
which is a Saturn OEM part. It's the pulley off the tensioner. After
this piece was made I powdercoated all the bracketry and alt. spacer
black.
 With
the S/C lined up in the belt path the best I could, I needed to
do a rebuild on the blower. There was some slack between when you
turned the pulley and the rotors actually turning. Inside the snout
of the blower there is a composite coupler that connects the pulley/drive
shaft to the gears that drive the rotors inside the case. This piece
is a wear item. I contacted Magunson who is the official Eaton rebuild
company to see what I could do. The salesman said they're not supposed
to sell to the public, so I called back and asked for a tech. This
worked. After talking to the tech about what I was doing he gave
in and sold me the coupler part, high temp bearing grease, special
Loc-Tite adhesive to put the case and snout back together, and the
oil for the snout. Yippee! When I had it all apart I did some mild
porting on the outlet and powdercoated the case and snout white.
I also had a shop in town remove the old seal and press a new seal
on the shaft in the snout were the pulley mounts. I then reassembled
the whole unit. I cut and mounted a plate over one of the openings
in the blower inlet. This was tapped for a brass fitting to get
vacuum to the by-pass valve. Two other openings were blocked off. With
the S/C lined up in the belt path the best I could, I needed to
do a rebuild on the blower. There was some slack between when you
turned the pulley and the rotors actually turning. Inside the snout
of the blower there is a composite coupler that connects the pulley/drive
shaft to the gears that drive the rotors inside the case. This piece
is a wear item. I contacted Magunson who is the official Eaton rebuild
company to see what I could do. The salesman said they're not supposed
to sell to the public, so I called back and asked for a tech. This
worked. After talking to the tech about what I was doing he gave
in and sold me the coupler part, high temp bearing grease, special
Loc-Tite adhesive to put the case and snout back together, and the
oil for the snout. Yippee! When I had it all apart I did some mild
porting on the outlet and powdercoated the case and snout white.
I also had a shop in town remove the old seal and press a new seal
on the shaft in the snout were the pulley mounts. I then reassembled
the whole unit. I cut and mounted a plate over one of the openings
in the blower inlet. This was tapped for a brass fitting to get
vacuum to the by-pass valve. Two other openings were blocked off.
 With
the manifold about done I drilled and tapped some holes for some
fittings. I had to have one for the boost gauge, air temp gauge,
FPR reference, and MAP sensors. I then powdercoated the manifold
silver. Off to the machine shop to have the flanges cut smooth.
The manifold was done in about 7 months. Now onto the t-body. With
the manifold about done I drilled and tapped some holes for some
fittings. I had to have one for the boost gauge, air temp gauge,
FPR reference, and MAP sensors. I then powdercoated the manifold
silver. Off to the machine shop to have the flanges cut smooth.
The manifold was done in about 7 months. Now onto the t-body.
 The
throttle body turned out to be a lifesaver. It measures in at 70mm.
Too much air, who knows. I wasn't sure if the IAC (idle air control
valve) would work. It has the same plug and looked like the one
on my Saturn (thanks GM), but will it idle correctly with it. The
TPS that was on the t-body wasn't adjustable and put out the wrong
voltage, so I scoured the local junkyard and found that the unsupercharged
3800 engines had an adj. TPS, and yes it bolts right up. The connector
was different than mine, but the wire colors the same. I disassembled
the t-body cleaned it up, powdercoated it white, and reassembled
it. I started on the 90-degree elbow to mount the t-body to the
S/C. I found one place that sells mandrel bent 90* aluminum elbow
pieces in a 2 ¾" diameter. Lucky me, except for the
price ($70). Oh well, on with the project. I cut out two flanges
to have welded onto this elbow. I set the angles it needed to be
and marked it. After having it welded I drilled and tapped a hole
for the PCV, and had a ½" aluminum barb fitting welded
on for the brake booster vacuum port. With a little porting with
a Dremel I cleaned up the inside of the elbow and ground the barb
fittings flush to the inside of the pipe. I used some "make-your-own
gasket" 1/16" cork to cut out the gaskets for the t-body
elbow. I had to find a way to make the throttle cable work, too.
The S/C t-body had a post on which the cable hooked onto. My cable
has the metal end that slides into a hole then rotates around to
hold it in. Back to my machinist I showed him what I needed and
he made a piece to slide the cable end into. I then cut off and
ground flat the post that was on the throttle arm. I had the machined
piece welded to the throttle arm. The cable mount was the next piece
of the puzzle. I made a plate out of 20 AWG sheet steel. It connects
to the head and the bottom t-body mount bolt. This has a modified
Saturn OEM throttle cable bracket bolted to it. It was made to adjustable
so I could slide it up or down to adj. for W.O.T. By now I had round
up most of the parts I needed to install this madness. I added a
fuel pressure gauge inside the interior so I'd know if the OEM pump
was trying to crap out on me. I already have a Wide-band O2 gauge
and boost gauge installed. Installation of this system would be
another 2-3 page write up. Instead of dragging on about every aspect
of the install I'll say after two days it was running. After four
days it was running perfect. The next week it was at the track and
I was all smiles. I took about a second off my usual 1/8th mile
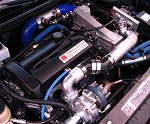
times. What can I say, it worked. It looks OEM sitting in the engine
bay and makes pretty good power. The
throttle body turned out to be a lifesaver. It measures in at 70mm.
Too much air, who knows. I wasn't sure if the IAC (idle air control
valve) would work. It has the same plug and looked like the one
on my Saturn (thanks GM), but will it idle correctly with it. The
TPS that was on the t-body wasn't adjustable and put out the wrong
voltage, so I scoured the local junkyard and found that the unsupercharged
3800 engines had an adj. TPS, and yes it bolts right up. The connector
was different than mine, but the wire colors the same. I disassembled
the t-body cleaned it up, powdercoated it white, and reassembled
it. I started on the 90-degree elbow to mount the t-body to the
S/C. I found one place that sells mandrel bent 90* aluminum elbow
pieces in a 2 ¾" diameter. Lucky me, except for the
price ($70). Oh well, on with the project. I cut out two flanges
to have welded onto this elbow. I set the angles it needed to be
and marked it. After having it welded I drilled and tapped a hole
for the PCV, and had a ½" aluminum barb fitting welded
on for the brake booster vacuum port. With a little porting with
a Dremel I cleaned up the inside of the elbow and ground the barb
fittings flush to the inside of the pipe. I used some "make-your-own
gasket" 1/16" cork to cut out the gaskets for the t-body
elbow. I had to find a way to make the throttle cable work, too.
The S/C t-body had a post on which the cable hooked onto. My cable
has the metal end that slides into a hole then rotates around to
hold it in. Back to my machinist I showed him what I needed and
he made a piece to slide the cable end into. I then cut off and
ground flat the post that was on the throttle arm. I had the machined
piece welded to the throttle arm. The cable mount was the next piece
of the puzzle. I made a plate out of 20 AWG sheet steel. It connects
to the head and the bottom t-body mount bolt. This has a modified
Saturn OEM throttle cable bracket bolted to it. It was made to adjustable
so I could slide it up or down to adj. for W.O.T. By now I had round
up most of the parts I needed to install this madness. I added a
fuel pressure gauge inside the interior so I'd know if the OEM pump
was trying to crap out on me. I already have a Wide-band O2 gauge
and boost gauge installed. Installation of this system would be
another 2-3 page write up. Instead of dragging on about every aspect
of the install I'll say after two days it was running. After four
days it was running perfect. The next week it was at the track and
I was all smiles. I took about a second off my usual 1/8th mile
times. What can I say, it worked. It looks OEM sitting in the engine
bay and makes pretty good power.
 This
is a general overview of what went on to design and build this supercharger
system. It's by no means a count for count log of events that made
it happen. Ten months of designing, building, buying, and modifying
took place to make this happen. It probably could have been done
sooner with more money on hand, but I took my time and I'm not made
of money, as a lot of you aren't either. This shows with the right
mindset of what needs to be accomplished and what you want, anything
is possible. Anytime a totally custom build up goes on, things happen.
Just be prepared to take care of each problem by its self. This
is a general overview of what went on to design and build this supercharger
system. It's by no means a count for count log of events that made
it happen. Ten months of designing, building, buying, and modifying
took place to make this happen. It probably could have been done
sooner with more money on hand, but I took my time and I'm not made
of money, as a lot of you aren't either. This shows with the right
mindset of what needs to be accomplished and what you want, anything
is possible. Anytime a totally custom build up goes on, things happen.
Just be prepared to take care of each problem by its self.
|


The turbosaturns.net
forum has become one of the best resources for Saturn performance
on the net. Our members are constantly pushing their cars to new
performance levels. So, log in, share your ideas, and help push
your car’s performance to the next level.

Archived Articles

August 2005 TSN will be holding its first ever meet
in Chardon, Ohio. Some of the fastest Saturns in the country will
be attending. Activities will include drag racing, dyno, tech session,
and BBQ. Look for the latest information in the forums.

Different
Racing

Jeff and his team Different Racing have big plans
on breaking into some really low quarter mile times this year. Last
year he posted a 12.40 on a pretty healthy nitrous shot. This year
he has a new turbo setup and some serious determination. Visit his
website for the latest news and information. I expect we'll be seeing
some low 12's from him by the end of the year.
|