|
Street Class Unlimited Class
DOHC SOHC Ion Updated 1/05 For the most recent list of the fastest five cars click here. |
Nitrous InstallBy: poc301This how-to is intended to give you a step by step guide to installing a wet nitrous kit on a Saturn. I installed this kit on my 2000 SL2 so all the pictures and install tips will reflect this model. If you don't feel comfortable tapping into the fuel system, drilling holes in your car, or setting up a system that WILL blow your motor if installed incorrectly, please don't attempt this installation. I will provide you with a detailed account of the install, what I did wrong and how you can avoid making the mistakes I did. I decided to add a nitrous kit to my car after I had exhausted all the bolt-on possibilities and still wanted more power. I have personally installed my intake, exhaust, power pullies, short throw shifter, ignition coils, plugs and wires, throttle body, header, cold air box, header wrap, brake pads, strut brace and swaybar. I'm no mechanic, I didn't have the know-how to install my clutch, lightweight flywheel, and didn't have tools to do my springs. But I'd say that with a good working knowledge of how the car works and where basic components are located you'll be able to do this install in a single afternoon. Nitrous oxide is simply "boost in a bottle". The most popular nitrous kits are the dry kits, which use the stock fuel injectors to increase the amount of fuel when spraying nitrous. Wet kits, on the other hand, require a solenoid that taps into the fuel rail spraying extra fuel into the intake when the nitrous is activated. A wet kit is safer because it doesn't rely on the stock fuel injectors for its fuel needs. In my case I had no choice but to use a wet kit. In 1999 Saturn changed their fuel system removing the fuel return line, which is needed for the dry kit. Nitrous can only be used when the throttle is wide open, and should only be used above 3000rpms. Once the nitrous is activated the temperature quickly reaches 575F on the compression stroke. This high temperature breaks down the chemical bond between the nitrogen and oxygen releasing the extra oxygen into the engine, thus "forcing" air into the motor. Nitrous also has the added benefit of cooling the intake charge by about 125F, which adds more power. For every 10 degrees you cool the intake air, you gain approx. 1% of total horsepower. For the money, nothing else will give the same gains in power as a nitrous kit. When you spray, it will feel like nothing can touch you. You will be able to outrun cars that are normally much faster than you, and do it without the constant strain on the engine that occurs when turbo or supercharging an engine.
Begin by installing the bottle in the trunk. I mounted it on the passenger side all the way in the rear of the trunk as shown in the pic. The brackets have 4 holes in them, two on the left side and two on the right. Decide where you will mount the bottle by first placing the bottle INSIDE the brackets and then putting the whole thing in the trunk. This will ensure that you have plenty of room for the bottle. Use a pencil to mark the mounting bracket holes where you will need to drill. Drill the holes and slide the bolts down through the holes. Climb under the car and screw the nuts onto the bolts, securing them. Unfortunately, the left side of the bracket was mounted over the muffler's heat shield so I couldn't bolt it down. I ended up taking it to get it welded to the trunk floor. It worked great! Run the nitrous feed lines to the engine compartment and make sure to keep the NX feed line ends capped so that debris doesn't get into the line. It is recommended that you route the hose through the car itself instead of under the car to avoid exposure to road-slime, the elements, and nasty suspension parts. I routed it through the passenger side of the car under the carpeting. The grommets holding the wires in the firewall of the 2000+ DOHCs are a pain to reach, and too small to fit this hose through, so I ran it through the door-area until I could find a better place to drill a new hole.
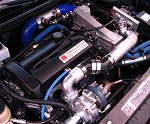
With the main nitrous line run through the car and into the engine bay, I moved on to the actual engine compartment for the next upgrade. This is where I began to feel the butterflies flutter in my stomach. If there was one place where I was most likely to screw up it was in this area. The first step is removing the intake tube. I removed mine in several pieces. First the filter element from the Twistec Cold-Air Box, then the main intake tube, and finally the elbow, which is unique to the 2000+ model Saturns (where the throttle body normally is on the 1991-1999 models). Now with the intake tube removed drill a ¾" hole somewhere between 2-6 inches from the throttle body (may vary depending on kit) to install the nitrous kit nozzle. I mounted mine on the elbow piece right by the bend. After drilling the hole, attach the nozzle mount by putting the
screw-threaded part through the hole from inside the tube, and screwing
the nut onto it. Make sure to use some sealant around the base of
the nut. I drilled the second hole and remounted the nozzle in a side position. I had to use a piece of duct tape to cover the gaping hole on the top of the tube :). I have since replaced the elbow piece with another and remounted the entire thing. Once the nozzle was mounted in the intake it was time to move on to installing the nitrous and fuel solenoids. It is wise to leave the intake off the car at this point, because it's easier to run wires and fuel/nitrous lines with the extra room.
After the nitrous solenoid is installed its time to move on to the fuel solenoid. Right behind the valve cover is a fuel line with a black cap on it. Underneath the cap, which simply pulls off, is a valve, which the NX system screws right into OEM compatibility is wonderful. Inside the car on the passenger side near the floor is a fuse box. Inside the fuse box is the fuel injection fuse. Remove the fuel injection fuse with the car running to kill the engine's fuel pressure. The engine will stall, which is normal. Leave the fuse out until you are finished with the fuel system. Next, remove the black plastic cap from the fuel tap and use a valve stem remover tool to remove the valve then attach the fuel feed line from the tap to the solenoid. A trickle of fuel should come out of the line, so have a rag ready to absorb any spills.
With the solenoids installed, it's time to wire up the switches
and solenoids. Use the self-explanatory wiring diagrams to wire
the solenoids. Simply connect a wire to ground and one to the wide
open throttle switch. To wire the relay, simply follow the diagrammed
instructions. Make SURE you ground the white wire that goes to the
Emergency Fuel Cut-Off Switch if you don't have one. Failure to
do so will cause the system to not work.
The purge switch is wired by connecting one wire to the ground and the other to the lead from the solenoid. Once the wiring is finished, it's time to test the nitrous system! First, test the purge switch. Arm the system with the arming switch and press the purge button. If you connected it properly you will hear a "click" from the purge solenoid.
CONCLUSION
When doing this install job, there are several difficulties I encountered that you can avoid: - Do NOT to drill the hole for the nozzle on the top of the intake tube. The hood will not close if you do. - Ground the white wire from the relay if you do not run a fuel cutoff switch. Failure to do so will cause the system not to work. - Use Teflon sealant on the fittings that go with the solenoids. Leaks will occur if you do not. - Make sure you can tell the difference between the fittings and the jets. I thought the screw-piece fittings for the solenoids were the jets at first and wondered why they were not labeled as the instructions indicate. The jets are the little gold caps that have numbers on the side. (I said this was the first time playing with nitrous, didn't I?) - Have a phone number or email address of someone who can help out if you get confused. This will help a lot if the need be. - Test all the solenoids BEFORE restoring fuel pressure or attaching the nitrous bottle to the feed line. - Do not turn the boost over 75hp or possibly 100hp on stock internals without retarding the timing. The chances are much higher that you will blow your motor, especially if you run 100hp or more. - NEVER EVER boost as you approach the speed limiter or the rev limiter. Always allow yourself a few hundred rpm buffer to make sure you don't hit a limiter while spraying. This can/will cause engine damage. - Only run 93 octane gas or higher when you are going to be using nitrous. Overall I love the Nitrous Express kit. It makes the car feel like a true performer. I thought the car was quick before the installation, but realized it was nothing compared to now. You will find yourself going through bottle after bottle during the first week. The feeling of being under boost is INCREDIBLE! |
|
 STEP
1: THE BOTTLE
STEP
1: THE BOTTLE STEP
2: THE ENGINE AND SOLENOIDS
STEP
2: THE ENGINE AND SOLENOIDS You
will need to follow the instructions that came with the kit to attach
the nitrous solenoid and/or a purge valve if you ordered one. There
are several different ways documented in great detail to attach
everything, so choose the one you are most comfortable with. Essentially,
you will attach the feed line from the bottle to the "Inlet"
marking on the nitrous solenoid, run the second line from the "Outlet"
marking on the nitrous solenoid to the intake nozzle. If you have
a purge kit, screw it into the purge port. I substituted red rubber
hose for the metal tube which came with the purge kit. Always make
sure you use Teflon thread sealant when you screw the lines into
the solenoids or you'll get leaks.
You
will need to follow the instructions that came with the kit to attach
the nitrous solenoid and/or a purge valve if you ordered one. There
are several different ways documented in great detail to attach
everything, so choose the one you are most comfortable with. Essentially,
you will attach the feed line from the bottle to the "Inlet"
marking on the nitrous solenoid, run the second line from the "Outlet"
marking on the nitrous solenoid to the intake nozzle. If you have
a purge kit, screw it into the purge port. I substituted red rubber
hose for the metal tube which came with the purge kit. Always make
sure you use Teflon thread sealant when you screw the lines into
the solenoids or you'll get leaks. Step
3: WIRING
Step
3: WIRING When
wiring the arming switch one wire goes to ground, one goes to the
wide open throttle switch, and another goes to the power source
(in my case the windshield wiper fuse).
When
wiring the arming switch one wire goes to ground, one goes to the
wide open throttle switch, and another goes to the power source
(in my case the windshield wiper fuse). Testing
the actual nitrous injection system. With the car OFF, the bottle
NOT connected, and the fuel pressure still at zero, arm the system
and press the wide open throttle switch. If done correctly you will
hear a "click" from both the nitrous and fuel solenoids
as they activate. If not, check your wiring and try again. Now make
sure everything is tight, plug the fuel injection fuse back in,
and go enjoy your new nitrous system!
Testing
the actual nitrous injection system. With the car OFF, the bottle
NOT connected, and the fuel pressure still at zero, arm the system
and press the wide open throttle switch. If done correctly you will
hear a "click" from both the nitrous and fuel solenoids
as they activate. If not, check your wiring and try again. Now make
sure everything is tight, plug the fuel injection fuse back in,
and go enjoy your new nitrous system! I
went into this install job fearing it. I had never done anything
of the like before, and this was all new to me. I simply followed
the instructions that came with the kit, and all went well (or almost
well).
I
went into this install job fearing it. I had never done anything
of the like before, and this was all new to me. I simply followed
the instructions that came with the kit, and all went well (or almost
well).