|
Street Class Unlimited Class
DOHC SOHC Ion Updated 1/05 For the most recent list of the fastest five cars click here. |
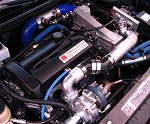
Turbo Timer Installby:TitanThere is a significant investment of time and money into any turbo install and with that in mind making the system last as long as possible is defiantly a priority. Enter the turbo timer. This little device will extend the life of your precious turbo, which in the end will increase reliability of the total system. I wasn’t interested in all the bells and whistles that some of the new timers had I just wanted something that would keep the car idling. My new turbo timer arrived in about a week and I immediately tore into the package with youthful enthusiasm. There it was; my new turbo timer, instructions, wires, and packaging material strewn all across my living room floor. I couldn’t wait to install this new “performance” item. The instructions were pretty straight forward with wiring diagrams included for Mazda, Mitsubishi, Nissan, Toyota, and so on but no Saturn. “No problem,” I thought to myself, “I’ll just look it up on the net.” After searching the net for awhile I couldn’t locate any information on a turbo timer install in a Saturn. I even asked around and it seemed that no one had ever installed a turbo timer in a second gen. Saturn. I was entering uncharted waters. With unwavering resolve I jumped in the car and drove to the local Radio Shack. After about 25 minutes I walked out with a new voltmeter and some 18-14 gauge wiretap connectors in hand. Armed with my Haynes manual, voltmeter, and wire connectors I headed for the garage. The first step was deciding on a location to mount my turbo timer. I already have an after market stereo installed so I decided to mount the timer in the small tray right above the stereo. This provided a perfect place for the timer since I never use the tray and once mounted the timer can be easily viewed from the driver’s seat. I disassembled the plastic around the stereo and removed the tray. I then drilled a hole through the back of the tray, threaded the wires through the hole, and routed the wires through the back of the center console and underneath the driver’s side dash. I remounted the stereo and crawled under the dash in search of the ignition switch wiring harness.
Using the wiretaps that I purchased from Radio Shack allows me to tie in without cutting the factory wiring harness. I spliced the 12v constant wire from the turbo timer to one of the red 12v constant factory wires. Next, I spliced the 12v accessory wire from the timer to the brown 12v accessory factory wire. Lastly, I spliced the 12v run wire to both the pink and orange wires which, are 12v when the key is in the run position. Splicing the turbo timer 12v run wire into both the pink and orange wires is extremely important if you want the turbo timer to operate properly on a obd-2 Saturn. After the ignition wiring was spliced I extended the ground and e-brake wires. 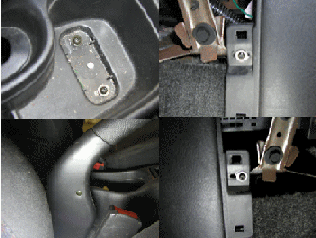
There are 5 screws that must be removed to access the e-brake switch. Two screws are located in the back of the center console. There is one screw on the e-brake cover facing the passenger side. The last two can be located under the passenger side fuse cover and driver’s side access cover. Both of these covers are on the sides of the center console by the floor which, are held in by Velcro. Once the center console is loose you can tilt it up toward the shifter to gain access to the parking brake switch. 
There are two wires that lead from the e-brake switch, a light blue positive wire and a black ground. I wire taped into both of these wires using the blue wire for the e-brake tie-in and the black wire as a ground for the turbo timer. The light blue wire reads 12v when the key is in the run position and the e-brake is down. When the e-brake is engaged the blue wire will read 0v. I then replaced the center console and tucked all the wires under the dash. This installation guide provides you with a quick and inexpensive way to add some reliability to your turbo system. *Trouble shootingIf you splice the blue wire to only the orange wire the turbo timer will count down but the car will shut off as soon as you remove the key. If you splice the blue wire to only the pink wire the timer will count down and the car will remain running but after 25 seconds the service engine light will illuminate. Splicing 12v to the pink wire will keep the ignition running but the orange wire drives the Quad drivers. The computer continuously checks the Quad driver circuit while that car is running. Without power to the quad drivers the computer throws a non-viewable fault code P1641 after 5 seconds and after 20 additional seconds the fault code P1640 is tripped which illuminates your service light. If the car idles after the key is removed but the service light comes on after 25 seconds then your Quad drivers are probably not receiving power. Splicing the blue wire to both the pink and orange wires ensures that the Quad drivers receive power while the turbo timer is counting down and the car is idling. Special thanks to Todd Scarberry at the Dayton Saturn dealership for this information. At this point I have not spliced my tach wire in yet because the Saturn coil pack wiring diagram is hard to interpret. I believe that the wire that I’m going to tap into is the “k” wire in the center of 5 wires coming off the coil pack. Also, I am considering wiring the turbo timer into the fan relay so that when the turbo timer kicks on the fan comes on at the same time. This should defiantly help with the cool down. |
|
 Let
me be the first to tell you that wedging your body under the dash
is pretty uncomfortable. With my trusty garage light and voltmeter
I began the tedious job of probing the ignition switch wires. I
limited myself to the 5 larger wires 2 red, 1 brown, 1 orange, and
1 pink. Using the voltmeter I found that the 2 red wires were 12v
constant, the brown wire showed 12v when the key was turned to accessory,
and the orange and pink wires (see trouble shooting) showed 12v
when the key was turned to the run position. With the wires identified
it was now time to splice into the wires.
Let
me be the first to tell you that wedging your body under the dash
is pretty uncomfortable. With my trusty garage light and voltmeter
I began the tedious job of probing the ignition switch wires. I
limited myself to the 5 larger wires 2 red, 1 brown, 1 orange, and
1 pink. Using the voltmeter I found that the 2 red wires were 12v
constant, the brown wire showed 12v when the key was turned to accessory,
and the orange and pink wires (see trouble shooting) showed 12v
when the key was turned to the run position. With the wires identified
it was now time to splice into the wires.